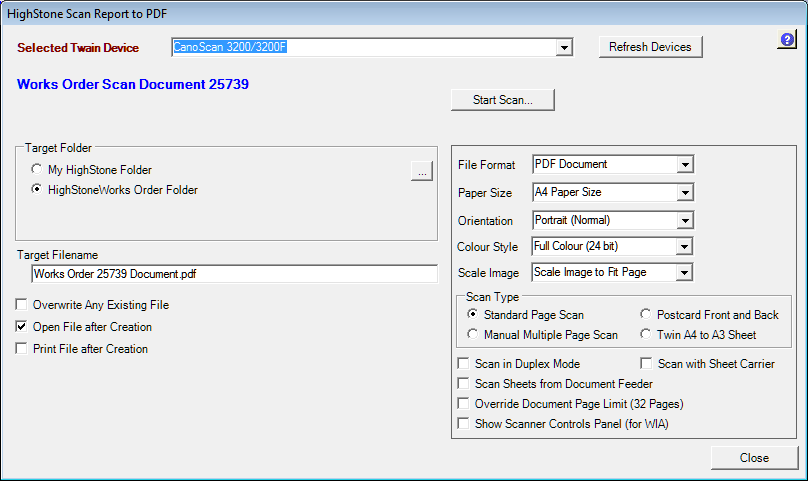
Scan Report to PDF Prompt Panel

Selected Device -This pull-down control lists the current connected Twain Scanning Devices (typically only one device will be listed). Select the Target Device that is to be used.
If no Twain Devices are listed, Scanning of Documents will not be possible. If necessary, check the connections to, and the power status, of target Devices and click on the Refresh Devices command button to refresh the list.
The scanning facility is only available when the Scanner is attached directly to the local computer. Scan facilities across a LAN / WAN configuration is not supported. The host Scanner must support Twain connection protocols unfortunately there is no guarantee that all Twain Compatible scanners will operate fully with HighStone.
Target Folder - Select the target Folder where the scanned image files are to be saved. This may be the User My HighStone Folder, or (if appropriate) the HighStone Target Object Folder for the current Object Record.
Target Filename - Specify the filename that is to be used for the scanned document; typically a default filename will be given. A warning will be given if a target file of the same name already exists. The file extension is set automatically.
Overwrite Existing File - if this Option is set then any existing file will be deleted and over-written automatically. Note that any existing file must not be open or locked by the current, or any other, User.
Open File after Creation - If selected the created file will be opened automatically in the default Application for the target file type (PDF Files are opened by Adobe Acrobat).
Print File after Creation - If selected the created file will be printed automatically to the current Default Printer device. The printing action is undertaken by the default Application for the target file type (PDF Files are opened by Adobe Acrobat), hence, the PDF file is created and saved and the target Application is called and opened. Some Applications may open in a separate window and may not close after Printing has been completed. If control over the Printer device is required, then use the Open File option and then control Printing from within the Application.
File Format - Set the required file format:
-
PDF (.pdf) Document (Multiple Pages are supported)
-
Jpeg (.jpg) Image Document (Single page images only)
Orientation - Set the Orientation of the Page for the scan.
-
Portrait [Taller than wide]
-
Landscape - With 'Top Edge' to the left [assuming the document is face down]
-
Landscape - With 'Top Edge' to the right [assuming the document is face down]
Colour Style
- Full Colour (24 bit)
- Greyscale
- Black and White
- Pallette Colur (8 bit)
Scale Image- Select the target Paper Size
- Scale Image to Fit Page - The proportion of the original image is maintained as the image is scaled so that the entire image is shown on the PDF page. The image is not cropped, the image may not fill the page in both axis directions.
- HighStone supports the use of Duplex (two-sided scanning), document feeders etc where available with a
-
Stretch Image to Fit Page - The original setting whereby the image is scaled differently in both axes to make the image fit the full PDF page. The image will not be clipped - but the result may be distorted.
-
Do Not Scale Image - The image is drawn to the same scale as it was scanned. The actual size will depend on the source scanner settings. The image will be cropped if the size exceeds the PDF page area.
Scan Type
Manual Multiple Page Document - Check this option if the target document has more than one page and all pages are to be scanned to a single PDF Document (Jpeg Scan Formats do not support this option).
Postcard Front and Back - When using the Postcard Front and Back facility HighStone prompts for two scans - the Scan Front… and Scan Back…. If the scan takes a full A4 image size (i.e. the entire scanner plate is scanned) then HighStone will crop the images to take the top portion only - taking what is essentially a Rotated (Landscape) A5 size image from the top half of the scanner plate. Images scanned directly to the Rotated (Landscape) A5 size will be used in their original format without cropping.
HighStone will automatically rotate the scanned image depending on the option selected. For Multiple Page Documents the Orientation may be changed between each scanned page.
HighStone supports the use of Duplex (two-sided scanning), document feeders etc where available with a 32 page limit imposed on automatic multi-side scanning (intermediate image files held in memory).
Click on the Scan Image… command button to start the scanning process. The Device Twain User Interface panel will be displayed, where the scanner controls and a preview can be set before a final 'Scan' is completed. After the page has been scanned, the Device Twain User Interface panel will close and control will return to the HighStone panel.
For single page scanned documents, the process is then complete and the target file will be created. For Multiple Page Documents, HighStone will display two command buttons:
Next Page - To scan the next page (the Orientation may be changed between pages)
Finish - To complete the scan and create the target file on the system. The maximum page count supported by HighStone for Multiple Page documents is 64.
Click on the Close command button to close the Scan Report prompt panel.